Linksys RE4100W Setup | N600
Your wireless home network’s range can be extended up to 6,500 square feet by performing the Linksys RE4100W setup, a plug-in device. With the extender’s simultaneous dual-band wireless connectivity, eliminate dead spots and enjoy seamless streaming, online gaming. Uninterrupted gaming and web browsing. After completing the Linksys RE4100W setup you can use its crossband feature.
This feature allows information to be received on one band and transmitted on another, resulting in fewer dropped data packets, faster media transfer speeds, and a stronger, more consistent signal throughout your home.

Here are the Linksys RE4100W setup instructions:
- Plug your RE4100W Extender into a power outlet.
- Turn on your computer or laptop and connect it to the internet connection.
- A new window will appear requesting for the WiFi password.
- Enter password to continue.
- Open one of the web browsers installed on your computer
- Enter extender.linksys.com in the URL bar and press Enter.
- Doing so will open the default extender login page.
- Enter username and passphrase.
- Then click on the login button to continue.
- Now, follow the on-screen steps to set up the Linksys RE4100W.
That is all! Your RE4100W N600 WiFi Range Extender has been successfully configured and installed. But if the above mentioned steps don’t work for you, please visit our Linksys Extender Setup page and follow the complete setup steps.
RE4100W LINKSYS N600 PRO DUAL BAND WIFI RANGE EXTENDER:
FEATURES AND SPECIFICATIONS
A complete set of information has always been a blessing, never a disadvantage. The same applies here when it comes to the Linksys RE4100W setup. For this reason, we will first go through the features and characteristics of this incredible range extender.
Compatible with All
The Linksys RE4100W setup is compatible with virtually everyone, both in terms of routers and in terms of operating systems. The headache you have is whether the extender is compatible with your home router or modem and the operating devices you have in your home. It absolutely sounds like a win-win.
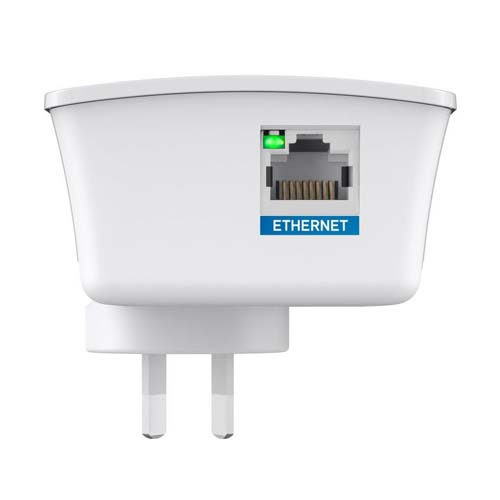
Fast Ethernet Port
Yes, there is a Fast Ethernet port that comes with the Linksys RE4100W setup. There are times when one needs a faster internet connection, for whatever reason, and that’s where you can make use of this fast Ethernet port. So, enjoy stable yet fast network data transmission with the Ethernet port of the Linksys extender.
Audio Feature
Did you know that your Linksys RE4100W N600 Pro Dual Band WiFi Extender is equipped with an audio capability feature? This feature helps you connect your home stereo to a Wi-Fi network. This makes it easy to stream audio such as music or podcasts. You will be able to do this through your system. High five with him.
Spot Finder
The point detection technology of this dual band range extender helps the user to install and connect the extender at the exact location. By exact location, we mean where you are getting the network from your home router, moreover, it is also at the edge of the internet dead zone to make it possible to use the extender fully.
Configuration at Ease
Regarding Ease of Setup, you can easily configure and install your Linksys RE4100W WiFi Range Extender. There are three ways to accomplish this setup, and we explain all of them in the setup guide mentioned in the paragraphs below. So, go ahead and then choose a medium for the setup.
Cross-Band Technology
Crossband is one of the most essential technologies for network devices because it is a smart technology. This smart technology ensures that you’re always on the fastest bandwidth on your network. So you don’t need to convert it yourself, the Linksys RE4100W Range Extender will do it for you.
LINKSYS RE4100W MANUAL SETUP (WEB-BASED)
- Power cycle the home router and power the Linksys Extender from the power source.
- Use an Ethernet cable and connect the operating device to the Linksys re4100w extender.
- Then, sign in to the Linksys network and disconnect from another network if you’re connected to it.
- To log into the Linksys re4100w extender, open a browser and enter the address http://extender.linksys.com.
- Enter the defaults and get started with network setup and optimization. Everything as you wish.
WPS SETUP METHOD
WPS setup is another convenient way to start the extender. Use the WPS button on both the extender and the router to setup the Linksys RE4100W. Please clarify that your router has a WPS function.
- To get started, plug the extender into a power outlet.
- Then push the extender’s WPS button.
- In the next step, press the WPS button on the router.
- Doing so will complete the connection.
- After connection, the extender’s LED will be solid for a few seconds.
- So the Linksys RE4100W setup is now complete
If still uncertain about how to set up a Linksys RE4100W extender? Contact us by way of live chat.
Linksys 4100W N600 Extender Setup Firmware Update
Firmware update on any device is important and should be done on time. It is not believed that this process will be delayed. So, if you haven’t updated Linksys re4100w firmware yet then follow the steps.
Please download your device’s firmware in advance.
1.First, open the Linksys Extender web portal using extender.linksys.com
2.There is a ‘Management’ option on the dashboard which appears on your screen.
3.The last option is ‘Firmware Update’
4.Go to it and browse and flash the downloaded firmware.
Finish the process by rebooting your device. All of it was related to the Linksys RE4100W Range Extender’s firmware update.
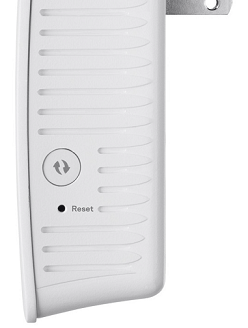
Linksys RE4100W Reset Extender
- Locate the Reset Button: On the Linksys RE4100W Wi-Fi extender, there should be a small reset button, usually located on the side or at the back of the device. It is typically labeled “Reset” or represented by a circular arrow symbol.
- Power On the Extender: Ensure the extender is plugged into a power source and turned on.
- Press and Hold the Reset Button: Use a paperclip or a small pointed object to press and hold the reset button for approximately 10 seconds. You may need to use a bit of force to press the button fully.
- Observe the LED: While holding the reset button, you should see the LED lights on the extender start to blink. This shows that the reset procedure is active.
- Release the Reset Button: After around 10 seconds, release the reset button.
- Wait for the Reset to Complete: Allow the extender a few moments to complete the reset process. The LED lights may continue to blink during this time.
- Restart the Extender: After the reset process is finished, the extender will restart automatically.

Once the extender has restarted, it will be restored to its factory default settings. This means any previous configurations, such as Wi-Fi network names (SSIDs) and passwords, will be cleared, and the extender will revert to its original settings.
After the reset, you will need to set up the extender again by following the initial setup process as mentioned in the user manual or the setup guide that came with the extender. This typically involves connecting to the extender’s default Wi-Fi network and using a web browser to access the setup page. From there, you can configure the extender with your preferred settings, including connecting it to your existing Wi-Fi network to extend its coverage.